Amazon Listing Optimization The COMPLETE Guide [EXAMPLES]
Amazon Listing Optimization The COMPLETE Guide
Amazon listing optimization transforms an existing Amazon product listing into a sales converting powerhouse while also boosting visibility in Amazon product searches.
Optimizing Amazon Listings involves significantly improving the front end and back end of a listing including: Amazon Keywords, Amazon Product Title, Amazon Bullet Point Description, Amazon Product Description, Amazon Product Images, Amazon A+ Content, Amazon Listing Completeness, Amazon Category and Amazon Sub-Category
In over 10 years as a Fractional CMO, Amazon Consultant, and eCommerce Consultant, not to mention CEO, I’ve seen just about every mistake and the lessons from them. That means you get all the learnings without the scars.
Logging into Seller Central or Vendor Central and seeing low sales and a high ACoS is a gut punch.
Whether you’re selling Amazon FBA, Amazon B2B, Merchant Fulfilled or even Seller Fulfilled Prime, your product listings are your lifeblood on Amazon.
If you’re looking to increase Amazon sales, reduce ACoS on Amazon, optimizing Amazon listings is where you want to start.
You’re going to get my EXACT process when providing top-rated Amazon Consulting Services at my eCommerce Consultancy. You will be an expert at Amazon product listing optimization.

Amazon Keywords
To say the right keywords make or break you on Amazon is an understatement.
That’s what makes Amazon Keywords the natural starting point for how to optimize an Amazon listing.
When I’m working with my Amazon Consulting clients, I break Amazon Keywords down like this:
Amazon keywords work for your Amazon listing optimization in 2 ways.
- Indexing
- Relevancy
When you are indexed for a keyword, that means you appear on Amazons 1st page of search results, 25th page of search results and anywhere in between.
To get indexed by optimizing an Amazon listing, all you need to do is place the keyword somewhere once on the Amazon listing either front end or back end.
Where To Place Amazon Keywords To Optimize An Amazon Listing:
(* in order of importance)
- Amazon Product Title
- Amazon Bullet Point Description
- Amazon A+ Content
- Amazon Search Terms (tie)
- Amazon Subject Matter (tie)
Then, there is the other side of the Amazon product listing optimization visibility equation.
Relevancy pertains to how likely Amazon’s algorithm thinks your product will be in matching a customer search AND resulting in a sale.
Relevancy directly impacts:
- How visible you will be in Amazon Product Search Results. (Amazon SEO)
- How visible you will be in Amazon Advertising
- How much you will pay in Amazon Ads PPC
In other words, the more likely you are to result in a sale and match what the customer searched for, the more visible you will be and the less you will pay to be seen.
How To Optimize An Amazon Listing With Keywords For Relevancy:
(* in order of importance)
- Build a buzz OFF of Amazon around your subject matter (Amazon monitors this closely with Alexa)
- Send traffic from OFF of Amazon ONTO Amazon
- Amazon Influencers have been great at this for brands since 1996.
- Partnering with the right Amazon Influencer makes driving traffic easy.
- Use the keyword in your Amazon Product Title
- Use the keyword in your Amazon Bullet Point Description
- Use the keyword in Amazon A+ Content
- Use the keyword in Amazon Search Terms (tie)
- Use the keyword in Amazon Subject Matter (tie)
Using the keywords is only part of the story though.
How do you find Amazon Keywords to optimize your Amazon listing?
How To Find Amazon Keywords To Optimize an Amazon Listing:
There are primarily 3 methods to find Amazon keywords to optimize your Amazon listing.
METHOD 1: THE HARD WAY – MANUAL
Here’s how it works:
Step 1) Head to Amazon.com and start typing in a keyword that you think customers would use to find your product.
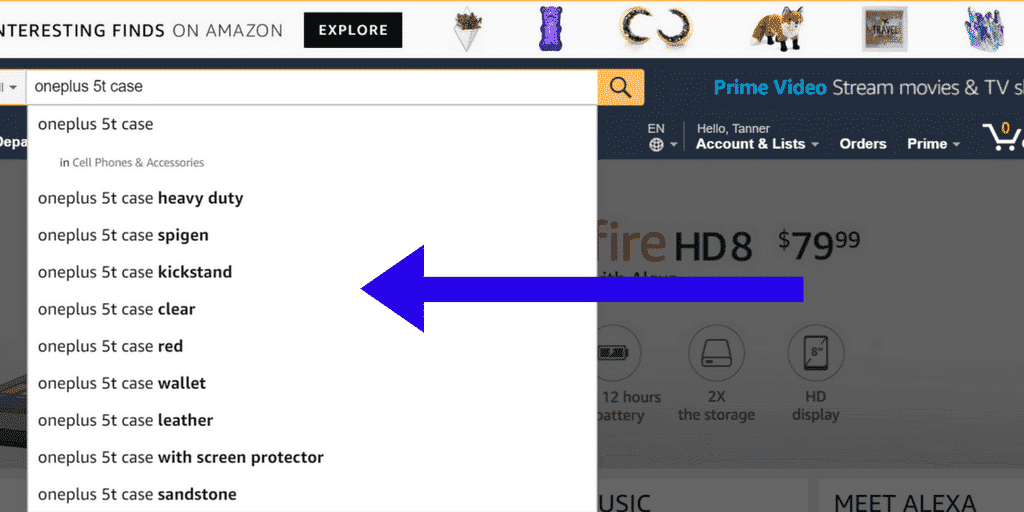
See the drop-down list with those keywords?
Those are buyer intent keywords.
Those are the keywords that Amazon has identified that:
- Get a lot of searches
- Get a lot of sales
Those are the keywords you want on your listings and also to run ads on.
Step 2) Head into an Amazon Listing itself and review the title, bullet point descriptions, reviews, questions & answers.
You will want to look at what keywords your competitors are using and also what keywords your customers are using in reviews as well as questions and answers.
Speaking how your target customer does is incredibly important and also happens to be a great way to get a good Amazon sales rank.
If sifting through listings and trying to figure out your competitors’ strategy seems time-consuming and difficult, you’re not alone and luckily you don’t have to do it.
So, there is good news.
METHOD 2: TAKE YOUR COMPETITORS KEYWORDS
The good news is, there are tools that make finding out the keywords your competitors are getting sales from as simple as a click of a button.
Plus, they barely cost anything at all.
I recommend Helium 10.
This is what you do:
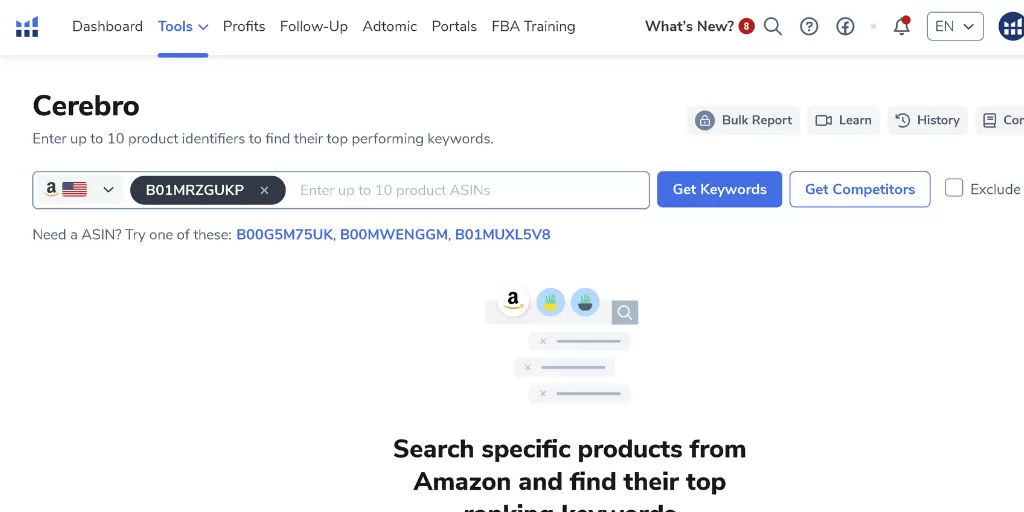
- Grab one of your main competitors ASIN’s.
- Head to Cerebro inside of Helium 10.
- Enter the ASIN
- Click “Get Keywords”
Repeat this step for the top 3 competitors that show up at the top of Amazon search results.
2) Create Your List of Amazon Keywords To Use
Now, create a giant list of keywords from those CSV files.
You’ll have something like this:
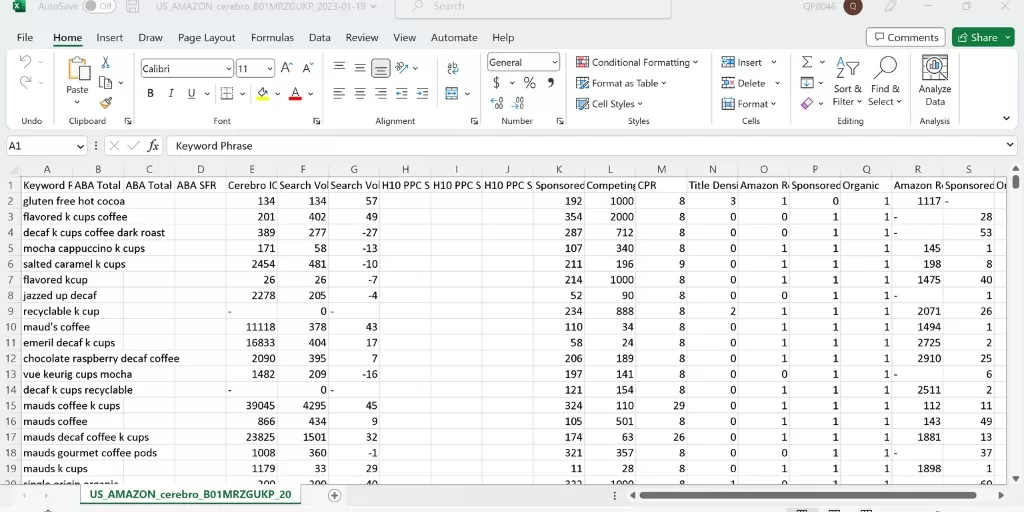
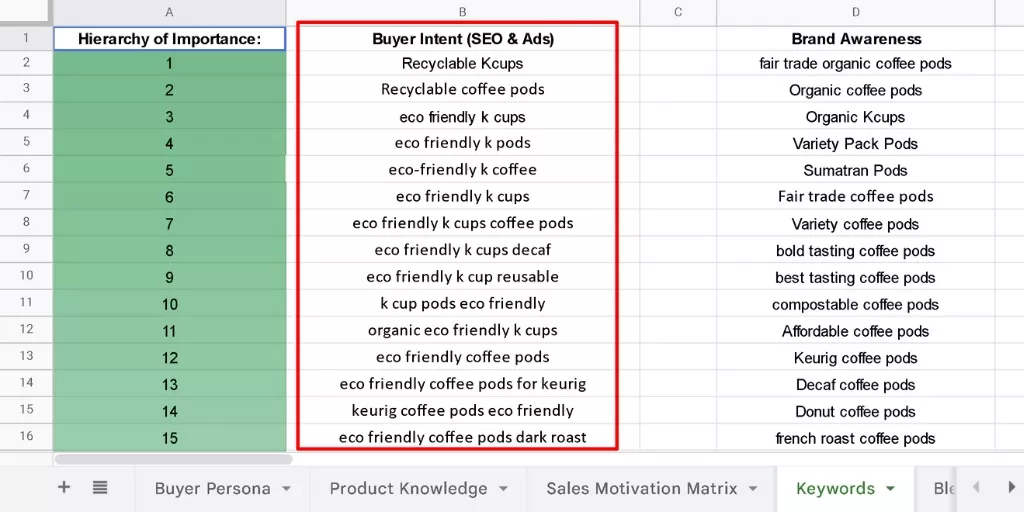
Go through the list and bucket your keywords into Buyer Intent and Brand Awareness.
It will look something like this:
This is where most Amazon Sellers get it wrong.
Most sellers strictly go after the most searched terms.
This is a critical mistake.
One of the strongest ranking factors is your Unit Session Percentage (Conversion Rate).
That means, for your Amazon SEO, you want to go after customers who have already done the research and are typing in keywords that indicate they want EXACTLY what you’re selling.
Even if the keyword search volume isn’t as low.
This is because they are more likely to convert which will increase Amazon SEO.
So, take the Buyer Intent Keywords and place them in one column.
For the other, general, broader keywords that typically have a larger search volume, bucket those into Brand Awareness.
You’ll have other strategies to get in front of the Brand Awareness, large volume keywords, but you want your Amazon SEO Strategy to be tightly focused on Buyer Intent Keywords.
Your Buyer Intent keywords
3) Remove Duplicates and Narrow Your Keywords Down To 500 Characters
You’re not just removing duplicate phrases, but words.
To enter keywords on the back end of Amazon, you’re looking to trim things down to 500 characters.
250 characters for Search Terms
+
250 characters for Subject Matter
This is how you do it for free:
- Use this free tool from Trace My IP.
- Paste in your list from your CSV
- Click Original Order
- Copy your string of keywords
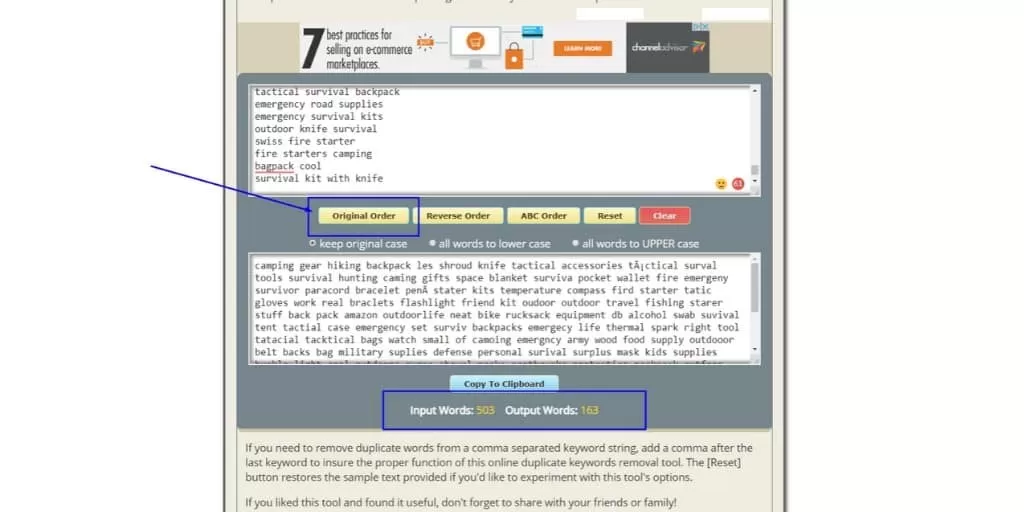
Now it’s time to trim them down even further.
- Head to Lettercounter.com
- Paste in your string from Trace My Ip
- Start trimming until you’re down to 500 characters.
You’ll have something like this:
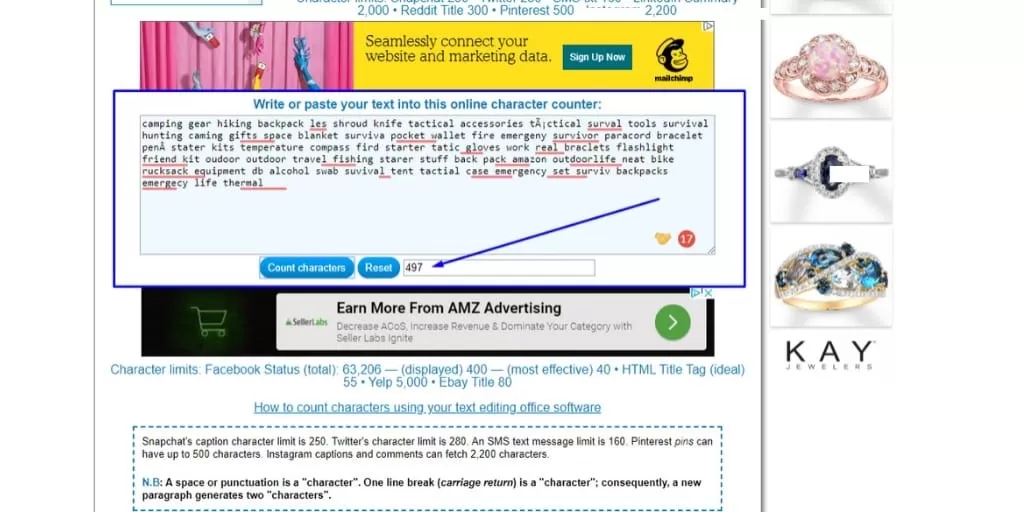
Now you’re ready to start entering keywords on the back end of Amazon in Subject Matter and Search Terms.
This is how you do it even easier with Helium 10:
1. Open up Helium 10 and go to the Frankenstein tool.
2. Paste in your list of Buyer Intent Keywords.
It will look like this:
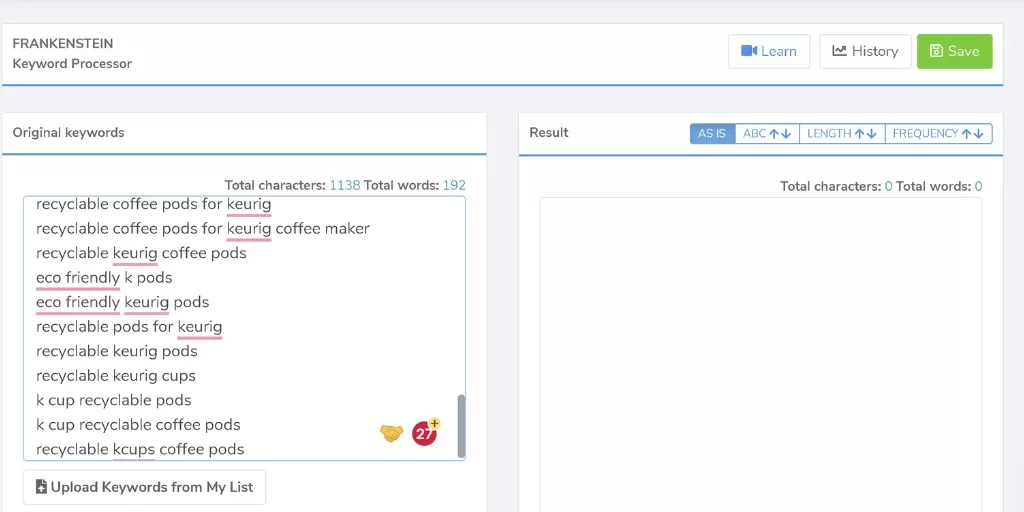
3. Leave the settings as they are, scroll down and click Process like this:
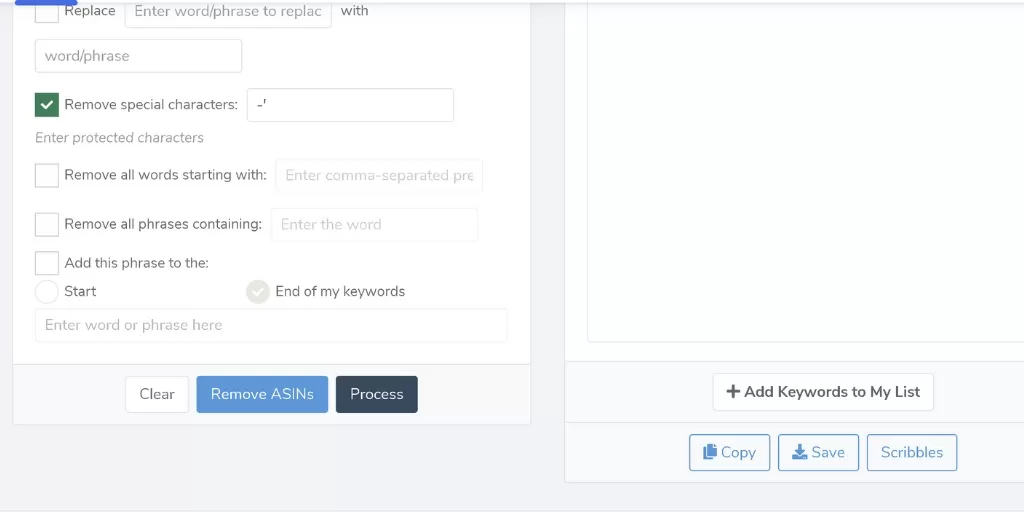
4. It will automate the process described above and you will notice there are far fewer words, like this:
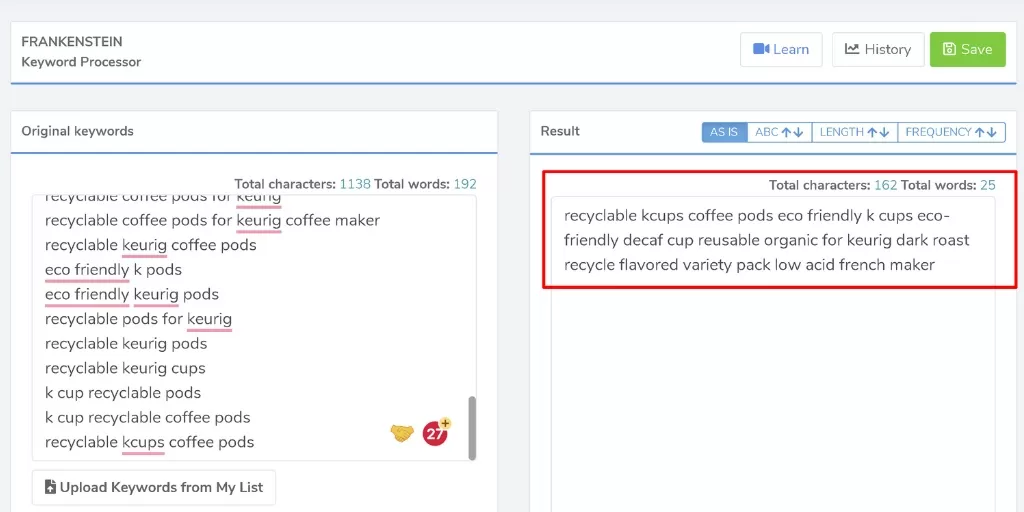
5. Simply click Save and you’re all set to proceed to the next step.
Or, you can use the Listing Builder tool in Helium 10 to optimize your listing for Amazon SEO and push it live right from inside the tool.
You can SAVE 10% OFF your monthy subscription of Helium 10 with code: SA10
4) Enter Your Keywords Into Search Terms and Subject Matter In Seller Central or Vendor Central
This is what’s important to know about how to use Amazon keywords in the back end of Amazon.
How Amazon Keywords Work In The Back End of Amazon:
- Amazon Platinum Keywords don’t count for you if you’re not a Platinum Seller
- Don’t bother with them
- You get 250 characters to use in Search Terms
- You also get 250 characters to use in Subject Matter
- Subject Matter is broken into 5 inputs that accept 50 characters each
- This is a total of 500 characters you get to use
- Use spaces to separate keywords
- Do not use commas ,
- Don’t use misspellings
- Don’t use other brand names that are not your own
- Don’t worry about plural vs singular
This is what you are going to do:
- Edit your product in Seller Central Manage My Inventory
- Head to the Keywords tab
- Scroll down to Subject Matter and click the Add More button underneath the field.
- Repeat this until you have 5 fields available to you
- Paste in your keywords, 50 characters at a time to each line until you’ve filled up the 5 lines of 250 characters
- Next, enter the remaining 250 characters into Search Terms
- Save, you’re all set!
You will have something like this:
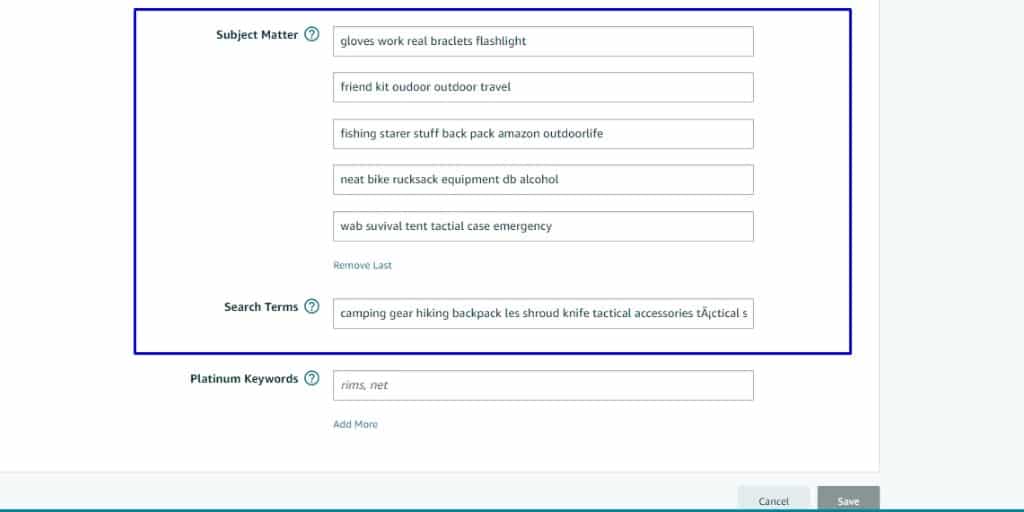
After you’ve saved, give it 15 minutes or so and then you can check to see if you’re indexed yet for the keywords.
It gets better though.
METHOD 3: EFFORTLESSLY GET KEYWORDS THAT DRIVE SALES
If you’re not familiar with buyer intent keywords, also known as commercial keywords, you will really enjoy this section.
Brian Dean over at Backlinko has a great article about commerical intent keywords.
But in short, there are:
- Research Keywords:
- These are the types of keywords people type in when they want to learn what their options are.
- EXAMPLE: iPhone Case
- These are the types of keywords people type in when they want to learn what their options are.
- Buyer Intent Keywords:
- These are the types of keywords people type in when they know what they want and are ready to buy, but they are looking for the best fit. The next click they make will be a purchase.
- EXAMPLE: Clear Gel Anti Scratch iPhone Case For iPhone 10
- NOTE: Notice how much more specific this example was?
- EXAMPLE: Clear Gel Anti Scratch iPhone Case For iPhone 10
- These are the types of keywords people type in when they know what they want and are ready to buy, but they are looking for the best fit. The next click they make will be a purchase.
These hyper-specific types of keywords will not only be your most profitable in ads, but also your most powerful SEO keywords for Amazon listing optimization.
Digging around on Amazon for hours to get these can be like trying to vacuum a beach, but luckily it doesn’t have to be.
Keyword Dominator gives you buyer intent keywords instantly.
Here’s how easy it is:
STEP 1) Simply log into Keyword Dominator and enter in a keyword that people would use to find your product and hit enter.
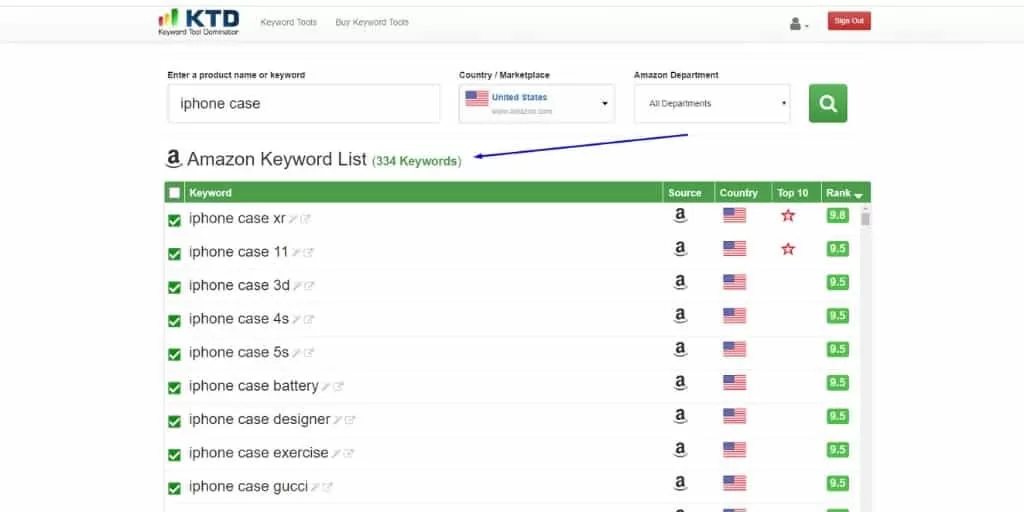
That’s it… look at all of those buyer intent keywords!
Sort out any that don’t make sense for your product and then add them to your listing and run ads on them.
It really is this simple.
But, how do you add them to the back end of your listing?
How To Enter Amazon Keywords On The Back End of Amazon To Optimize Your Amazon Listing
By now, you’ll have a giant list of keywords.
It will look something like this:
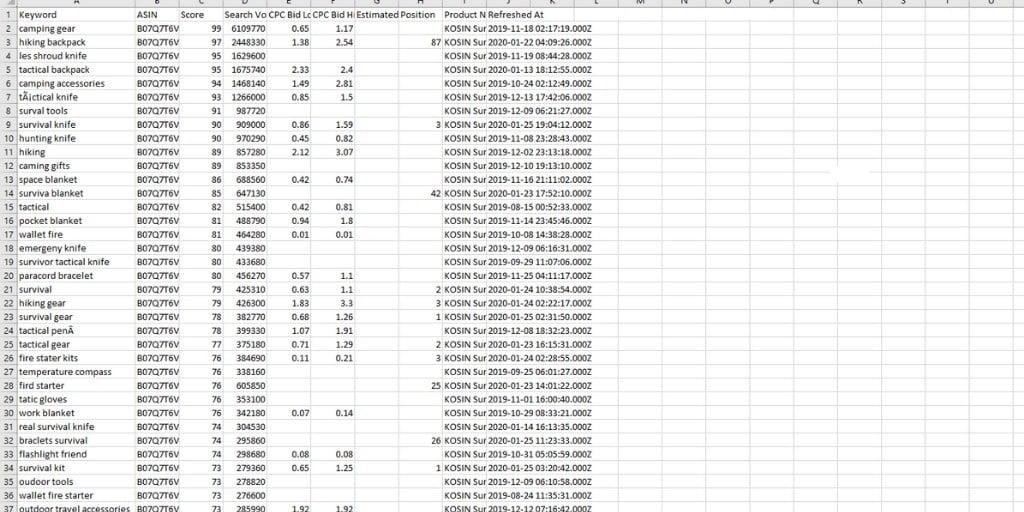
Now, this is important:
These are also the keywords you’ll be running manual advertising campaigns on.
So, make sure you have a copy of these as they are now before we go any further as we’ll be editing them for Amazon product listing optimization.
1) Remove Duplicates and Narrow Your Keywords Down To 500 Characters
You’re not just removing duplicate phrases, but words.
To enter keywords on the back end of Amazon, you’re looking to trim things down to 500 characters.
250 characters for Search Terms
+
250 characters for Subject Matter
This is how you do it:
- Use this free tool from Trace My IP.
- Paste in your list from your CSV
- Click Original Order
- Copy your string of keywords

Now it’s time to trim them down even further.
- Head to Lettercounter.com
- Paste in your string from Trace My Ip
- Start trimming until you’re down to 500 characters.
You’ll have something like this:

Now you’re ready to start entering keywords on the back end of Amazon in Subject Matter and Search Terms.
BONUS: Make The Amazon Listing Optimization Process Even Easier
The folks at Jungle Scout have a listing builder tool just for Amazon product listing optimization.
Here is how it works:
STEP 1) Find Keywords To Optimize Your Amazon Listing
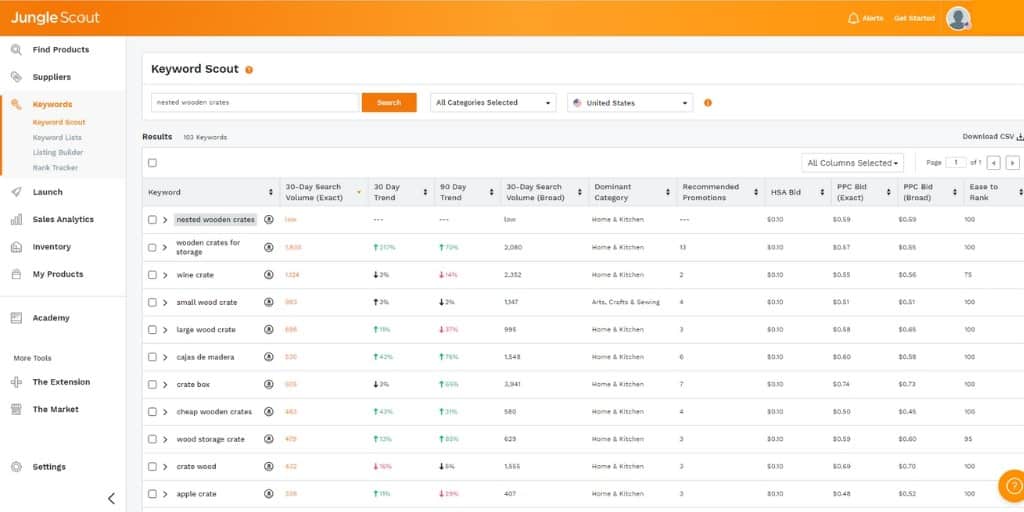
Jungle Scout has a Keyword tool similar to Scope that helps you find out what keywords to use for your listings and to run ads for.
You would start by finding some Keywords in Jungle Scout.
This is what it looks like:
STEP 2) Build a list of keywords you want to optimize your Amazon listing with.
Repeat the first step a few times and build up a robust list of keywords.
Then, you can import keywords into your list that you already have, such as from Keyword Dominator.
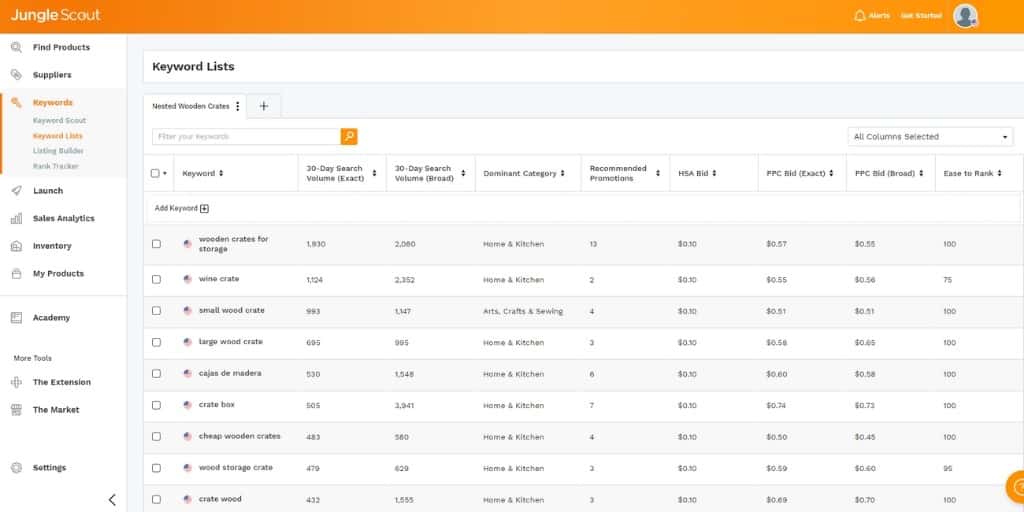
Then, add them to a Keyword List for that product.
It will look like this:
Once you have your list, you will want to build your listing.
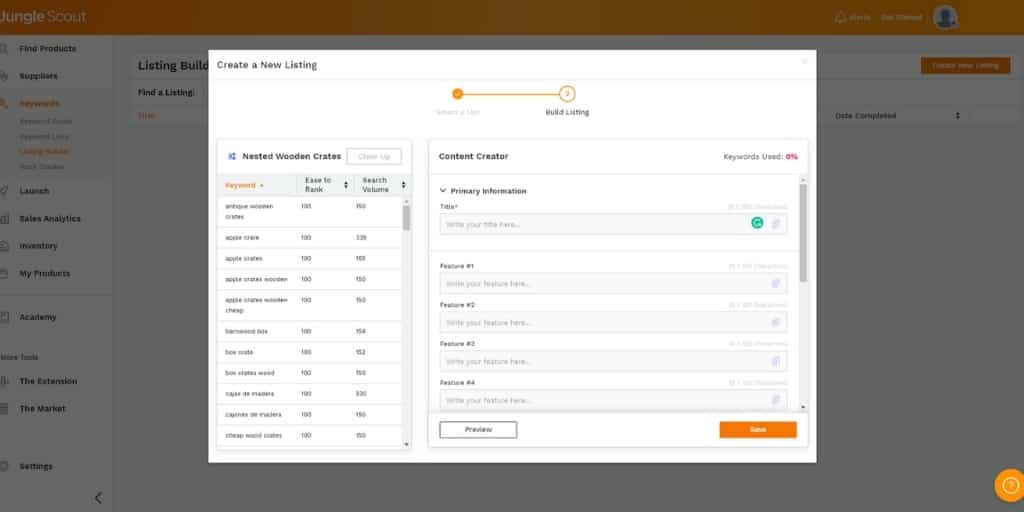
STEP 3) Build your listing.
Here, you can easily keep track of the keywords that you’ve used on your listing in the Title, Bullet Point Description, Search Terms, Subject Matter & more.
It looks like this:
Then you’re done!
The next step in Amazon listing optimization is to enter those keywords into the back end of your Amazon listing.
2) Enter Your Keywords Into Search Terms and Subject Matter In Seller Central or Vendor Central
This is what’s important to know about how to use Amazon keywords in the back end of Amazon to optimize your Amazon listing.
How Amazon Keywords Work In The Back End of Amazon:
- Amazon Platinum Keywords don’t count for you if you’re not a Platinum Seller
- Don’t bother with them
- You get 250 characters to use in Search Terms
- You also get 250 characters to use in Subject Matter
- Subject Matter is broken into 5 inputs that accept 50 characters each
- This is a total of 500 characters you get to use
- Use spaces to separate keywords
- Do not use commas ,
- Don’t use misspellings
- Don’t use other brand names that are not your own
- Don’t worry about plural vs singular
This is what you are going to do:
- Edit your product in Seller Central Manage My Inventory
- Head to the Keywords tab
- Scroll down to Subject Matter and click the Add More button underneath the field.
- Repeat this until you have 5 fields available to you
- Paste in your keywords, 50 characters at a time to each line until you’ve filled up the 5 lines of 250 characters
- Next, enter the remaining 250 characters into Search Terms
- Save, you’re all set!
You will have something like this:

Hit save and you’re all set!
But as we know, Amazon keywords is only part of the story of Amazon Listing Optimization.
Let’s take a deeper dive into Amazon Product Titles.

Amazon Product Title
When you sit down and say to yourself: “I need to optimize my Amazon listing”, in my Amazon Consulting experience, your product title is probably the first thing you think of.
And now that you have the best keywords, you’re ready to tackle your title.
Your product title directly impacts your Amazon CTR, which is the 2nd most important ranking factor.
This is the easiest way to think about the purpose of your product title as relates to Amazon Listing Optimization:
The Role of Amazon Product Titles:
- To get people to click on your listing instead of your competitors
- This goes double when trying to reduce the ACoS on Amazon by getting more interested buyer clicks on your ads
- To act as pre-sales to get people excited about your listing
- To handle objections
- To highlight the strengths of your product
- To act as a succinct elevator pitch for your product while also describing what it is
Here is how to write the best Amazon product titles:
How To Write The Best Amazon Product Titles:
- Keep the titles short: Although you’re allowed up to 200 characters, consider that mobile devices truncate your titles at around 80 characters and add the dreaded ellipses (…) – So keep your Amazon product titles at around 80 characters.
- Place the brand name at the front
- Model goes next
- Enter your most powerful keywords that describe your product
- Use Power Words to modify keywords or to describe your product
- Call out how your product is different or better than competitors
- Be specific on sizes & specifications, age groups, genders, etc.
- Include notes of distinction such as anything included free or bundled
Here is what that looks like:
EXAMPLE OF BEST AMAZON PRODUCT TITLE: BRAND – Extreme Camping Hatchet for Cold Weather, 36″, Ultra Sharp, Free Sharpener
Now, the next section is incredibly important for Amazon Conversion Rate Optimization.

Amazon Bullet Points
As a consultant for Amazon I can tell you that optimizing an Amazon Listing properly gives heavy focus to the bullet point description.
The thing is, you will want to develop the skills of an effective sales copywriter to pull this off properly.
The art and science of persuading people to take action is a critical skill of selling.
Otherwise, you’re just “listing stuff I think people will want to know to buy the product.”
You can spot those listings a mile away, usually a mile away from the first page of Amazon search results.
This cannot be understated. If you are serious about optimizing your Amazon listing, you want to become good at copywriting.
Here are some books that helped me become an effective sales copywriter:
- The Boron Letters by Gary C. Halbert & Bond Halbert
- Cashvertising by Drew Eric Whitman
- Predictably Irrational by Drew Ariely
- Dot Com Secrets by Russell Brunson
That said, if you’re looking for a formula to optimize your Amazon listing with great bullet point descriptions, follow this:
How To Write The Best Amazon Bullet Point Descriptions:
- BULLET POINT 1: State your main Unique Value Proposition of the product while clearly calling out who it’s for.
- BULLET POINTS 2: Highlight the top benefits your product offers, pain points or problems it solves.
- BULLET POINT 3; List features, Address any FAQ’s or handle any typical objections.
- BULLET POINT 4: Focus on how to use, ease of ownership, quality & craftsmanship.
- BULLET POINT 5: Reduce buyer risk by stating a clear worry-free warranty or guarantee.
That said, it goes without saying that as you craft your bullet point description to optimize your listing, you want to include your Amazon keywords.
NOTE: While Amazon recommends that you only need to use a keyword once to be indexed for it, this isn’t a best practice of effective copywriting or to boost your relevancy.
If some or many of your keywords help you write effective sales copy, include them as many times as needed.
This has an added benefit of relevancy.
If you’ve ever run a manual Amazon ad for keywords and went to check your impressions only to see the dreaded -, which means no impressions, then that means Amazon doesn’t think you’re relevant for a keyword even though you’re trying to pay for it.
They literally won’t take your money.
If this is the case when you’re running ads, you will want to optimize your Amazon listing by adding those keywords into the listing a few more times.
Learn more in: How To Write Amazon Bullet Points
One of the places you may or may not want to add them is in the product description section.

Amazon Product Description
There are a few important notes about the Amazon product description area:
- You have 2,000 characters to work with.
- You can use basic HTML to optimize your Amazon product descriptions to make them easy to read.
- Keywords used in this area are not indexed by Amazon.
- This means, using keywords here won’t help you in Amazon SEO.
- If you are Brand Registered on Amazon and have A+ Content, this replaces the Amazon Product Description section.
- This means, the content you have in the Product Description section will not show up if you’re using A+ Content.
So, does that mean that you shouldn’t optimize your Amazon Product Description area?
No, it doesn’t.
If you don’t have the ability to use A+ Content, this is where you go into greater detail about your product.
Here is what a well-optimized Amazon Product Description should contain:
What To Include In Amazon Product Descriptions:
- NAME OF THE PRODUCT
- UNIQUE VALUE PROPOSITION
- BENEFITS
- FEATURES
- HOW TO USE / HOW TO WEAR
- FAQ & OBJECTION HANDLING
- PRODUCT SPECIFICATIONS
- CALL TO ACTION
That said, at the end of the day when it comes to Amazon listing optimization, you are trying to entice potential customers to buy your product, so copywriting here is key.
You are going to want to format your Amazon product descriptions into an easy to read and easy to skim format while elaborating on key points from above in your bullet point description.
You do this with the simple HTML that Amazon allows you to optimize your listing with.
Amazon allows the following HTML:
- <b>Bolded Text</b>
- <br> – Line Break
- <p>Paragraphs</p>
- <li>Line Items aka: Bullet Points</li>
- <h2>Headline 2 Large Font</h2>
- <em>Italicize</em>
With the goal of making your Amazon listing appealing to look at, having effective images is a top priority.

Amazon Product Images
You can’t talk about Amazon Listing Optimization without an actionable discussion on Amazon product images.
As an award-winning Amazon Seller Consultant, here are the goals of your product images:
Goals of Amazon Product Images:
- Show how to use your product
- Show what your product does
- Show the benefits of your product
- Show the features of your product
- Show your product packaging
- Illustrate the results you get from using your product
- Illustrate what it feels like after having those results
- Showcase Before & After Images
- Bring attention to any key competitive features
- Increase the perceived value of your product
- Answer frequently asked questions
- Handle common objections
Here are some frequently asked questions about Amazon product images.
How Many Images Should I Have For Amazon Listing Optimization?
- 7
What Size Should A Well Optimized Images Be?
- 1,600 x 1,600 pixels
Can You Show Me Some Examples?
- Sure
This is an example of a Collagen Peptides supplement that reduces aging, helps with joint pain and more, Sparkle – Collagen Peptides
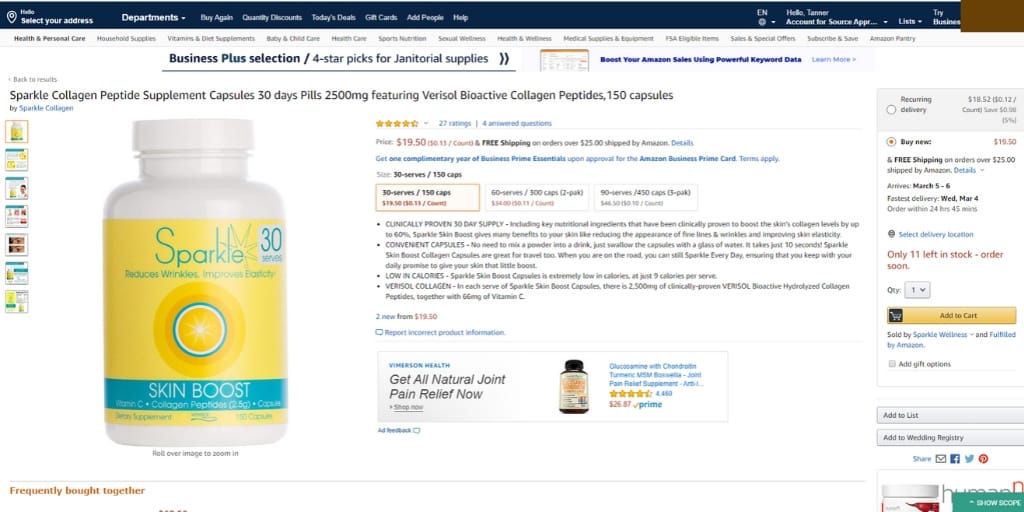
This product has a clean and typical featured image for the supplement industry. It is lit well lit and the colors pop.
However, note the 7 images used here.
They do a great job of all of the best practices listed above.
Here is a really powerful example from that Amazon product listing that drives sales:
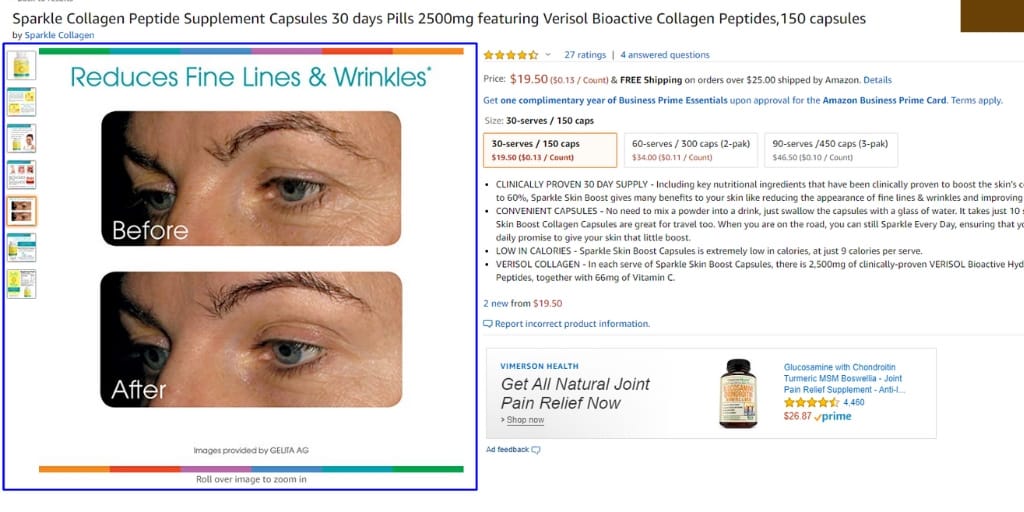
Before and after images skyrocket conversions through the roof. It’s that simple.
I go more in-depth in my article: Amazon Product Images Best Practices
Speaking of product images, Brand Registered Amazon Sellers have the added benefit of being able to use the next Amazon Listing Optimization opportunity A+ Content.

Amazon A+ Content
The easiest way to think of Amazon A+ Content is of a mini-landing page right on your Amazon Listing.
To illustrate this, let’s look at what a normal Amazon Product Description looks like:
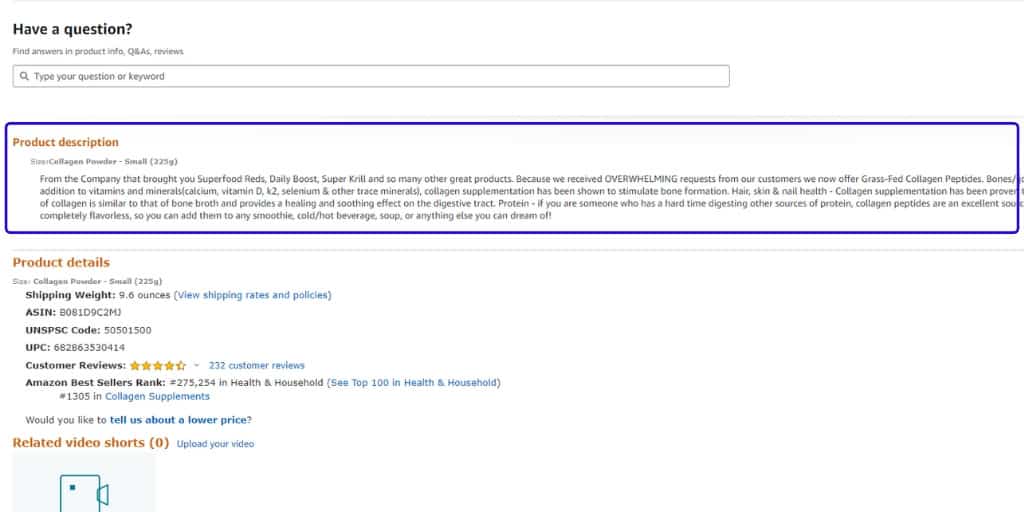
Now, let’s look at an Amazon Product Description with A+ Content:
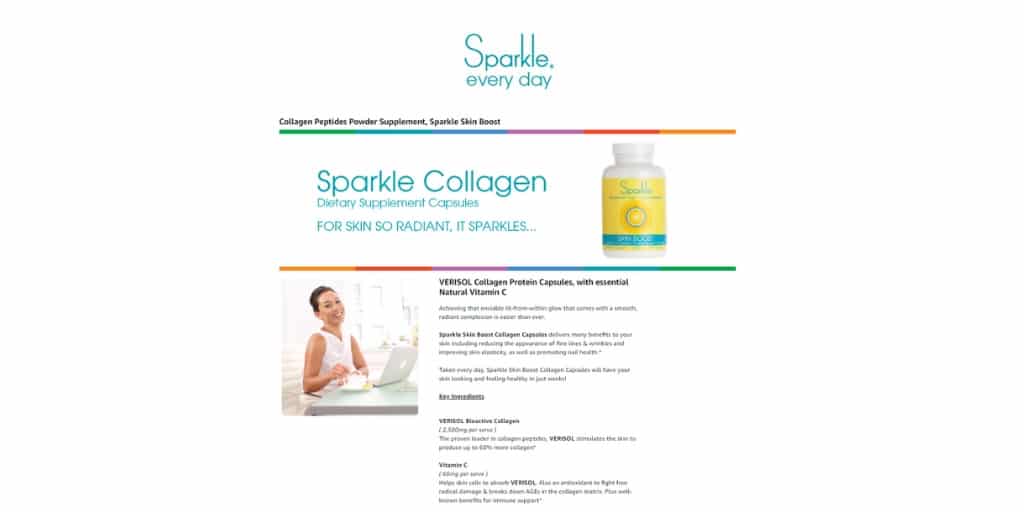
Which one looks better to you?
The A+ Content not only does a better job at converting sales, but it has more benefits.
Benefits of A+ Content:
- Significantly Boosts Conversions to Increase Sales on Amazon
- Drives Amazon SEO
- Helps Reduce ACoS in Amazon PPC
- Helps get a Good Amazon Sales Rank
Here are some of the frequently asked questions about Amazon A+ Content.
How Do You Get Amazon A+ Content on Your Listing?
- You need to be Brand Registered
- Under the Advertising Menu Dropdown, you will find A+ Content Manager
- There, you can build your A+ Content and apply it to ASINs
What is the Best Template For Amazon A+ Content?
- In my experience, I’ve found the following A+ Content setup the best:


How Many Modules Do I Get?
- Without purchasing Premium A+ Content you get 7 Modules
- The structure above has 9 modules.
- Not all products are suited for every single module described here.
- There are 9 modules here and unless you pay for premium A+ content you only get 5.
- If you do need all 9 modules here, you will notice one of the modules that Amazon offers is called: Standard Image Header with Text this is double the height of the modules described here at 970 x 600. This will allow you to quickly and easily combine the modules listed above to save on modules.
- NOTE: If you do not see the Amazon A+ Content section in your Advertising navigation menu, then you will want to contact Amazon Seller Support.
What Are The Image Sizes?
- Logo Image: 600 x 180
- Image Header with Text: 970 x 600
- Standard Image & Dark or Light Text Overlay: 970 x 300
- Standard 3 Images with Text: 300 x 300
- Standard Single Left Image: 300 x 300
- Standard Single Right Image: 300 x 300
- Standard Single Left Image: 300 x 300
What Are The Goals of Amazon A+ Content?
- You are taking a deeper dive than you could in Amazon Product Bullet Points or the Product Description area.
- The goals are similar:
- Unique Value Proposition
- Showcase any notable PR, Certifications & Awards
- Benefits
- Features
- How to Use / How To Wear
- Faq & Objection Handling
- Product Specifications
- Demonstrate how You’re Superior to Competitors
- Link to Your Other Products
A+ Content and Images are only part of the way you can sell and optimize your Amazon listing visually.
Enter, Amazon Product Videos.

Amazon Product Videos
A picture is worth a thousand words but a thousand pictures is worth a sale.
When optimizing your Amazon listing, you’re going to want to focus on Amazon Product Videos.
For Amazon Listing Optimization you’ll want to focus on Amazon Product Explainer Videos.
The nice thing about these is they can be cut down and used as Amazon Video Ads which are generally 15 seconds long.
In my experience, here are the specifications and structure you’ll want to follow for an Amazon Product Explainer Video:
Specs:
- ASPECT RATIO: 16:9
- RESOLUTION: 1920 x 1080 minimum
- LENGTH: 0:30 – 1:30min
- FILE TYPE: MP4
- IMAGERY: Live shots or animated. Dependent on brand & product. Show text on the screen of important points as most often these will be played without audio.
- AUDIO: Voice Over with Background Music Track
- VERSIONS: 1 for eCommerce Website / YouTube & 1 for Amazon For Amazon
Structure:
- The Agreeable Pain/Desire
- State the pain point/problem/desire in a way that your customer would agree.
- The Hook
- State that you’ve solved this problem and tease how.
- Branding Splash
- A quick showcase of your branding with your slogan or Unique Value Proposition.
- The Problem/Desire:
- Explain the problem you are solving or the desire you are fulfilling in a way your customer can relate to and demonstrates you can relate to them.
- Agitate The Pain/Stoke The Desire:
- Point out key areas that agitate the customers’ pain point or stoke their desire and suggest what it would be like if the problem was solved or desire was fulfilled.
- Your Solution is the ONLY Solution:
- Position your product as the only solution to their problem/desire by focusing on the primary benefits & features while leveraging verbiage that communicates that if they want the solution, they must go to you for the solution.
- The Other Side/The Promise Land:
- Demonstrate how it looks, feels, tastes & smells to have the solution to their problem or have their desire fulfilled by showing them the happy result of using your product.
- The Ask/The Close:
- Tell them to take action and how to take action.
But that’s not all, you’ll want to focus on uploading User Generated Content like reviews and unboxings to the Videos area of your product listing like this:
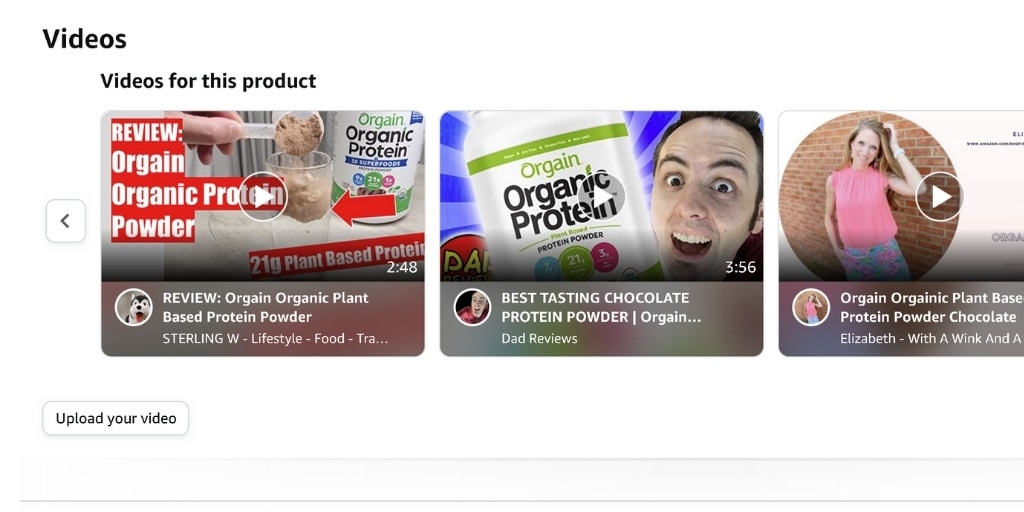
Speaking of reviews, if you want to Optimize an Amazon Product Listing, social proof is especially powerful.

Amazon Reviews
Simply put, reviews are your life on Amazon.
Amazon Reviews are important in 3 ways for Amazon Listing Optimization:
- Amazon Reviews Improve Click-Through Rates, Conversion Rates, SEO & PPC Performance
- You Can Use Content From Amazon Reviews To Improve Your Sales Copy
- Responding To Amazon Reviews Drives Sales
Let’s take a closer look.
1) Amazon Reviews Improve Click-Through Rates, Conversion Rates, SEO & PPC Performance
You need to get reviews on Amazon or everything else you do here will not work for you the way it is meant to.
Getting Amazon reviews will help you optimize an Amazon listing by:
- Improving Click-Through Rates by making your listing more appealing in a sea of other listings
- This goes for Ads and Amazon product search results organically
- Improves conversion rates
- The concept is called social proof, if it works for others, it will work for you
- Improves Amazon SEO
- Quantity and Quality of reviews directly impact your Amazon SEO, but so does your click-through rates and conversion rates, so it is all tied together.
I go quite a bit more in depth in “How To Get Reviews on Amazon” but here is what you should and should not do to get Amazon reviews:
How To Get Reviews:
- Use the Amazon Request a Review Button
- Use follow up email sequences
- Use a launch list
- Use product inserts
- Use great packaging
- Use the Vine program
What Not To Do:
- Incentivize reviews
- Ask for positive reviews only
- Use manipulative language such as: “we’re a small family-owned business” or “products made in the USA”
- Leave reviews on your own products or have family or friends do i
2) Use Content From Reviews To Improve Your Sales Copy
I’m honestly not sure why more people do not talk about this.
I mentioned earlier that if you are serious about Amazon Product Listing Optimization, you need to get good at copywriting.
A few of the best tricks of the trade for sales copywriting is to:
- Speak how your customers speak.
- Focus on the points they care about the most.
Here is how you do both.
- Head to the reviews of your product as well as your competitors.
- Take notes on:
- Verbiage that your customers use. (Example: Do they use “pop” or “soda”?)
- Common complaints
- Things they really like
- Revisit your Title, Bullet Points, Product Description and / or A+ Content by infusing these key details.
Speaking of mining customer reviews for critical product description information, this next part is just as fruitful for Amazon Listing Optimization.

Amazon Questions & Answers
Amazon Questions & Answers help Optimize Amazon Listings by:
- Addressing pre-sales questions
- Handling Objections
- Uncovering key details that you need to cover in the sales copy, product images and A+ Content
- Demonstrating good customer service from the brand by addressing customer requests for information
This is what an Amazon Questions & Answers section looks like:
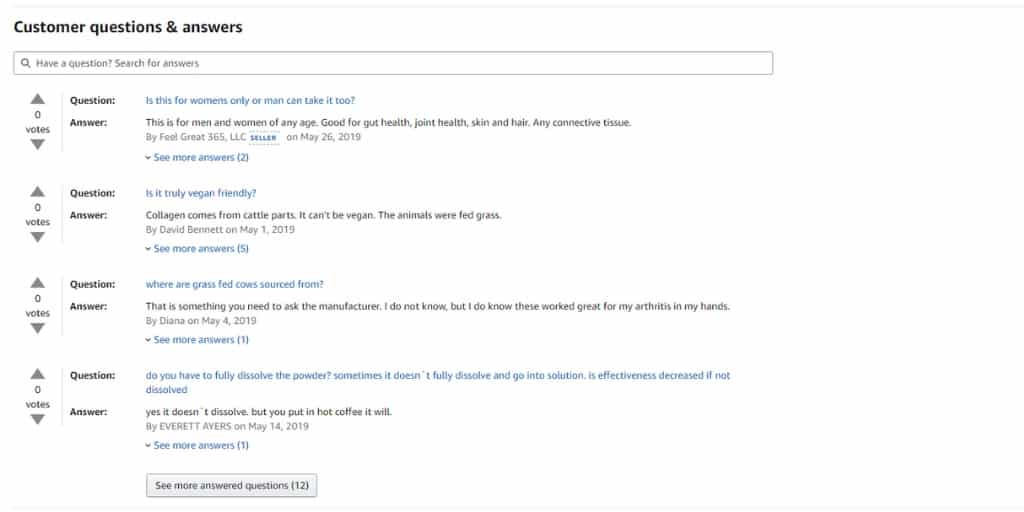
There are 2 best practices when it comes to Amazon Questions & Answers for Amazon Listing Optimization.
Amazon Questions & Answers Best Practices:
- Answer every question as soon as possible
- Review your products Questions & Answers as well your competitors in order to:
- Identify opportunities to improve your own listings
Improving your listings isn’t only customer-facing however.

Amazon Category and Sub-Category
Being in the wrong product category and subcategory can sink a product before you even get out of the gate.
Amazon Listing Optimization heavily involves being in the right product category and sub-category.
This isn’t something you want to gloss over when you first list your product.
Let’s take a look at this welding product:
Notice how specific their categories are?
Amazon Product Category & Sub Category Best Practices:
- Make sure your product category is as close as possible to your subject matter
- Take a look at your key competitors and identify their product category
Should I Ever Change My Product Category?
- If you are having a difficult time getting impressions on ads, or visibility in Amazon Product Searches, one of the things you should check is if you are categorized correctly.
- Amazon may not feel you are relevant for the searches you are trying to get visibility for due to miscategorization.

Amazon Leaf Nodes
What are Amazon Leaf Nodes?
Amazon Leaf Nodes are internal references to product categories and sub-categories that only Amazon Seller Support can see.
When you first create a product on Amazon using their Seller Central User Interface or an Inventory Flat File, you select the categories and sub-categories that your products belong in.
Once you’ve selected your Categories and Sub-Categories, your products are supposed to get assigned to the corresponding Browser Nodes.
Then, from the Browser Nodes, your products are assigned to more specific Leaf Nodes.
Things like keywords are understood and routed through Amazons’ search algorithm by their connection to Leaf Nodes.
If you are having trouble ranking for keywords or not getting impressions on ads that you are trying to run on specific keywords, you will want to check in with Seller Support to verify your product is assigned to the correct Leaf Nodes or any Leaf Nodes at all.
How Do You Know If You Have Leaf Nodes/The Correct Leaf Nodes?
Ever since the development of the Amazon SAS Core, Amazons’ paid tier of Seller Support, Amazon Sellers have started learning about their IDQ score, which is Amazons’ internal metric which you cannot see in Seller Central that essentially amounts to Listing Completeness.
Leaf Nodes are part of this IDQ score.
SAS Core representatives have been distributing a defective ASIN report that again, is not available in regular Seller Central and on the report, they will specify if your product has been added to Leaf Nodes or not.
What this has revealed is, many times, just because you select the correct product categories and sub-categories, it doesn’t mean that Amazon will connect your product to the corresponding Leaf Nodes, which is critical for Amazon Listing Optimization.

Frequently Asked Questions
By the way, if you want to sell more and spend less, I’m the only top-rated AI Fractional CMO, Amazon Consultant & eCommerce Consultant with 10+ years of Fractional CMO Agency, Amazon Consulting & eCommerce Consulting experience, blending AI & the award-winning Source Approach method for blazing fast, scalable results.
Get a quick free consultation.







![How to Switch From FBA to FBM [Step By Step]](https://www.sourceapproach.com/wp-content/uploads/2024/08/How-to-Switch-From-FBA-to-FBM-The-Source-Approach-Amazon-Consultant-eCommerce-Consultant-Fractional-CMO.jpg)
![Amazon Posts EVERYTHING You Need To Know [EXAMPLES]](https://www.sourceapproach.com/wp-content/uploads/2024/08/Amazon-Posts-Everything-You-Need-To-Know-The-Source-Approach-Amazon-Consultant-eCommerce-Consultant-Fractional-CMO.jpg)
